
The post aims to show how to create Jupyter environments and how to debug any issues. It also provides some commands that are good for general debugging.
Table of Contents
Debugging Commands
Here are some commands I’ve found useful when debugging issues with my Jupyter environment. You’ll see them used in the examples below.
Conda environments and Jupyter kernels
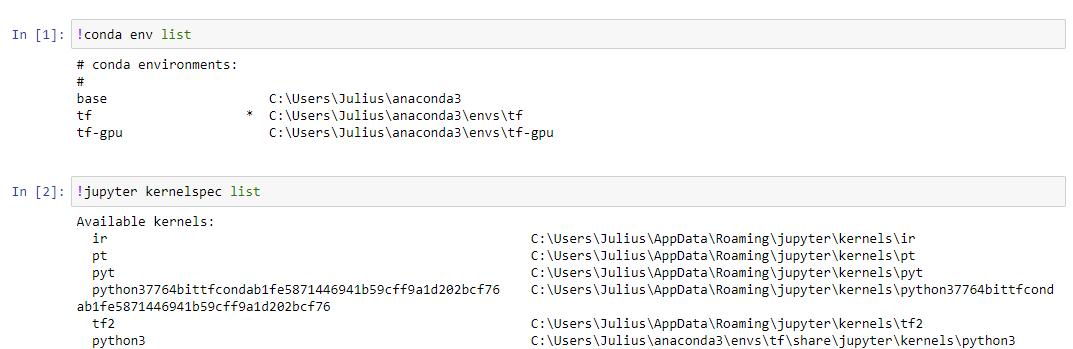
Two things you’ll want to know when debugging Jupyter environment problems are what conda environments you have and what kernels are available to Jupyter. You can find your environments with either
conda env list or conda info --envs
They provide the same information.
What Python interpreter am I using?
In Python:
import sys
sys.executable
/Users/julius/opt/anaconda3/envs/my_env/bin/python
Note that if you are in your base environment, it might look different:
/Users/julius/opt/anaconda3/bin/python
What kernels are available to Jupyter?
jupyter kernelspec list

Where are my kernels located?
The exact location may vary, but it should look something like this:
/root/.local/share/jupyter/kernels/
But if it’s a machine you’re directly working on, you won’t have access to /root, so it’s probably somewhere like /home/julius/.local/share/jupyter/kernels/
You should also be aware that different kernels will have different paths. For example, import my_package may work in one kernel but not in another. Check sys.path to see which paths are being called.
Keep in mind that you can run all of the commands either from a terminal or from a Jupyter notebook. To run a Unix command from Jupyter, you simply need to add a ! before it. So you can run !conda info --envs or !jupyter kernelspec list from a notebook.
OK, now let’s talk about some examples where you might need these.
What is the active kernel?
Here’s the only way I’ve found how to do this (source):
%%javascript
var kernel = Jupyter.notebook.kernel
kernel.execute('kernel_name = ' + '"' + kernel.name + '"')
print(kernel_name)
# my-kernel
from jupyter_client import kernelspec
spec = kernelspec.get_kernel_spec(kernel_name)
print(spec.resource_dir)
Adding Kernels
You’ll need to be in the environment where you launch Jupyter for this to work. Once you’re there, you can add kernels like so (display name is optional):
python -m ipykernel install --user --name myenv --display-name "Python (myenv)"
Now, if you reload your Jupyter Notebook page, your new kernels should be available (you shouldn’t need to restart your Jupyter Notebook server).
If you want to add a kernel from one environment to another, say you want to add a new environment kernel to your main environment, you’ll need to specify which Python you’re referring to:
(my_main_env) ➜ /Users/<username>/opt/anaconda3/envs/my_new_env/bin/python -m ipykernel install --user --name my_new_env
You absolutely must include the full path name to Python, otherwise, you’ll have to edit your kernel.json file. To get the full path, go to your new environment and enter which python. Note that you’ll also have to pip install ipykernel in the new environment.
Note that if you don’t include --name my_name, the kernel will be connected with your default ipython kernel, which might be something like /Users/<username>/Library/Jupyter/kernels/python3
Removing Kernels
You can remove a kernel like so:
jupyter kernelspec uninstall my_kernel
Environment not showing up in Jupyter
Let’s say you have three conda environments: py2, py3_env1 and py3_env2. You activate py3_env1 and then started a Jupyter Notebook in your environment. You start a notebook and everything looks right. But when you try to import packages that you know are in py3_env1, they are missing. Confused, you check which environment you’re in.
!conda env list
# conda environments:
#
base                     /opt/conda
py2                      /opt/conda/envs/py2
env1                  *  /opt/conda/envs/py3_env1
env2                     /opt/conda/envs/py3_env2
This looks fine. So you check to see what interpreter you’re using
import sys
print(sys.executable)
it says
/opt/conda/envs/py3_env2/bin/python
What? Why is it using the py3_env2 Python interpreter? The answer is in the available kernels. The way to solve this depends on how exactly you got here. First, we’ll look at it assuming this is inside a Docker container that you created.
Python and environment not matching
If you’re in your PT environment but that’s not the Python distribution you’re seeing when you sys.executable, you’ll need to edit your kernel.json file that you found with jupyter kernelspec list.