
This post is going to demonstrate how to use the Albumentations library with TensorFlow.
Table of Contents
import os
import random
from functools import partial
from os.path import join
from pathlib import Path

import albumentations as A
import matplotlib.pyplot as plt
import numpy as np
import tensorflow as tf
from tensorflow.keras import optimizers
from tensorflow.keras.applications.mobilenet_v2 import MobileNetV2
from tensorflow.keras.layers import Dense, GlobalAveragePooling2D
from tensorflow.keras.models import Model
from tensorflow.keras.preprocessing import image
AUTOTUNE = tf.data.experimental.AUTOTUNE
Loading Data into Tensorflow
First we point to our images. Our goal is to get a list of all the images that we can pass to tf.data.Dataset.
root_path = Path('E:/WallabiesAndRoosFullSize/train')
Let’s see what class names we have
class_names = np.array(sorted([folder.name for folder in root_path.glob('*')]))
print(class_names)
['kangaroo' 'wallaby']
Let’s load them into tf.data. All the images are ordered, so we’ll want to shuffle them.
dataset_images = tf.data.Dataset.list_files(str(root_path/'*/*'), shuffle=True)
We’ll specify the size we want the results to be.
IMG_HEIGHT = 128
IMG_WIDTH = 128
BATCH_SIZE = 32
Now we’ll make a function to parse the images and labels. There are lots of ways to resize your image and you could do it in both Albumentations or TensorFlow. I prefer to do it right away in TensorFlow before it even touches my augmentation process, so I’ll add it to the parse function.
def parse_image(filename):
    # start with the image
    img = tf.io.read_file(filename)
    image = tf.io.decode_jpeg(img, channels=3)
    image = tf.image.resize(image, (IMG_HEIGHT, IMG_WIDTH), method=tf.image.ResizeMethod.NEAREST_NEIGHBOR)

    # then do the label
    parts = tf.strings.split(filename, os.sep)
    label = parts[-2]
    one_hot_label = parts[-2] == class_names
    label = tf.argmax(one_hot_label)

    return image, label
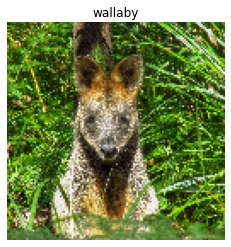
Now let’s visualize an image to see if that worked.
dataset_images_mapped = dataset_images.map(parse_image)
image, label = next(iter(dataset_images_mapped))
def show(image, label):
    plt.figure()
    plt.imshow(image)
    plt.title(class_names[label.numpy()])
    plt.axis('off')

show(image, label)
Augmentations
OK, we’re good in shape. Now let’s add augmentation to it. Let’s select some augmentations we want to try.
transforms = A.Compose([
    # spatial-level transforms (no distortion)
        A.HorizontalFlip(p=0.5),
    # pixel-level transforms
        A.CLAHE(p=0.25),
        A.RandomBrightness(limit=0.15, p=0.5),
        A.RandomContrast(limit=0.15, p=0.5),
        A.RandomGamma(gamma_limit=(80, 120), p=0.5),
])
Now we’ll write a function to pass to tf.numpy_function. This will perform the albumentation transforms.
def aug_fn(image):
    """
    Function to apply albumentation transforms and cast the result data type.
    """
    aug_data = transforms(image=image)
    aug_img = aug_data["image"]
    aug_img = tf.cast(aug_img/255.0, tf.float32)

    return aug_img
def process_data(image, label):
    aug_img = tf.numpy_function(func=aug_fn, inp=[image], Tout=tf.float32)
    return aug_img, label
Now we’ll use the functions to create the dataset.
ds_alb = dataset_images_mapped.map(process_data, num_parallel_calls=AUTOTUNE).prefetch(AUTOTUNE)
ds_alb_batched = ds_alb.batch(BATCH_SIZE).prefetch(AUTOTUNE)
ds_alb_batched
<PrefetchDataset shapes: (<unknown>, (None,)), types: (tf.float32, tf.int64)>
isinstance(ds_alb_batched, tf.data.Dataset)
True
There we go! Now we’ve got our dataset ready. Let’s take a look at it.
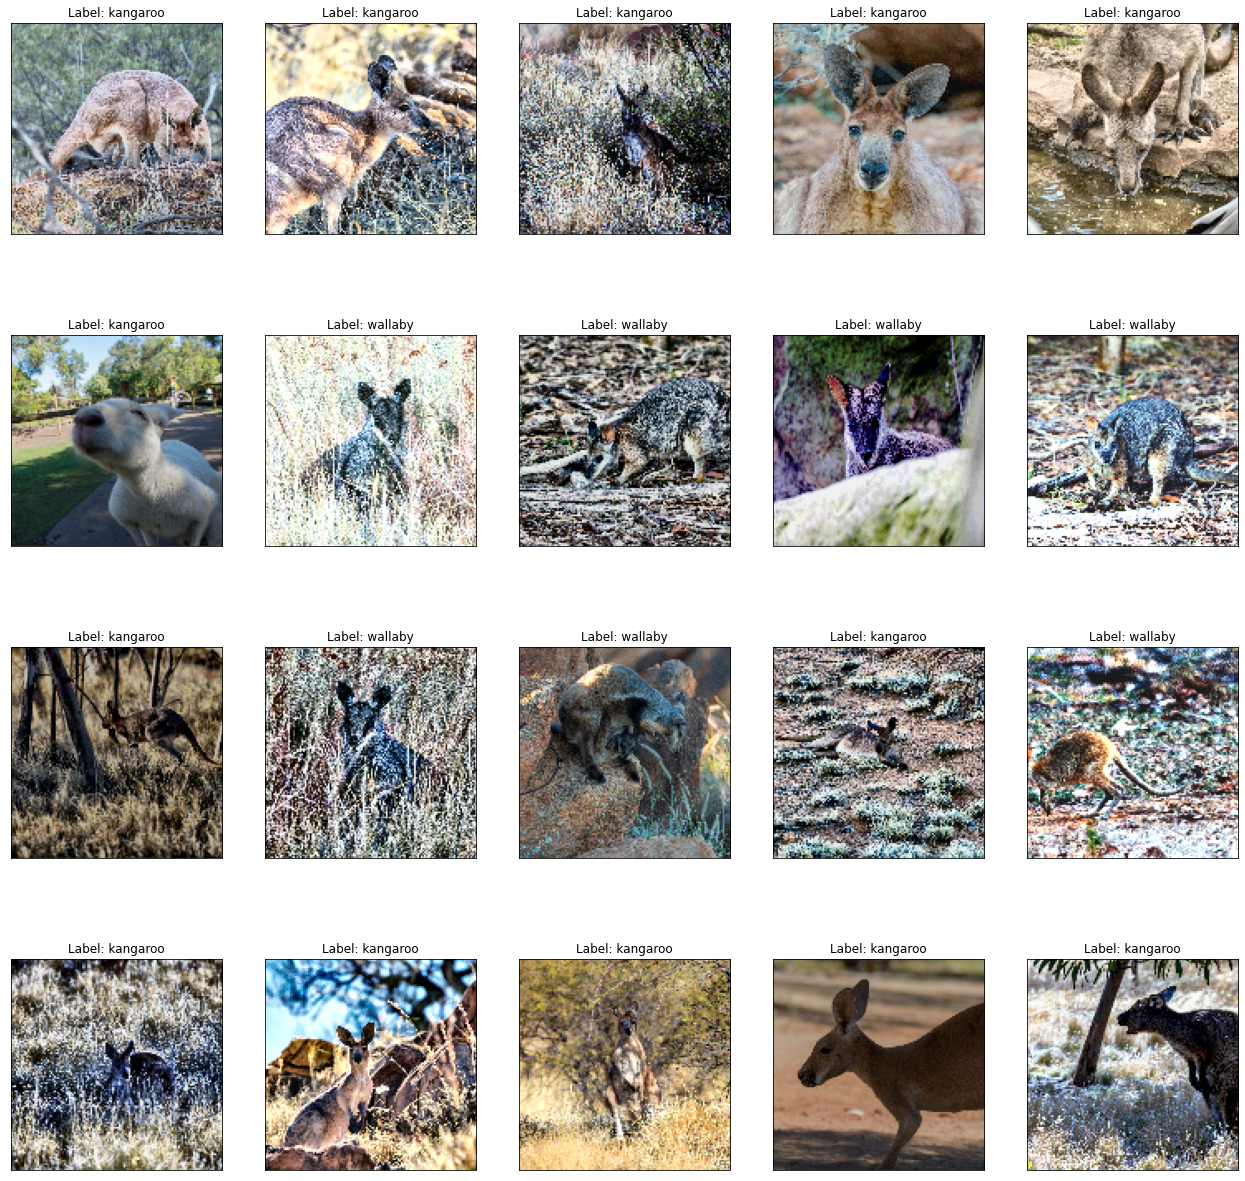
Visualizing Results
Let’s build a function to visualize the results.
def view_image(ds):
    image, label = next(iter(ds)) # extract 1 batch from the dataset
    image = image.numpy()
    label = label.numpy()

    fig = plt.figure(figsize=(22, 22))
    for i in range(20):
        ax = fig.add_subplot(4, 5, i+1, xticks=[], yticks=[])
        ax.imshow(image[i])
        ax.set_title(f"Label: {class_names[label[i]]}")
view_image(ds_alb_batched)
Train Demo Model
Just to show that it works, let’s take one batch of the data and train a very simple model on it. It’ll overfit but that’s OK - it still works to show how TensorFlow and Albumentations work together.
ds_alb_batched = ds_alb_batched.take(1)
We’ll use MobileNetV2 because it’s a very small - yet performant - model.
base_model = MobileNetV2(input_shape=(IMG_HEIGHT, IMG_WIDTH, 3), weights='imagenet', include_top=False)
x = base_model.output
# We can do flattening or global average pooling
x = GlobalAveragePooling2D()(x)
x = Dense(128, activation='relu')(x)
output = Dense(1, activation='sigmoid')(x)
model = Model(inputs=base_model.input, outputs=output)
for layer in base_model.layers:
    layer.trainable = False
model.compile(loss="binary_crossentropy", optimizer=optimizers.Adam(), metrics=["accuracy"])
model.fit(ds_alb_batched, epochs=5);
Epoch 1/5
1/1 [==============================] - 5s 5s/step - loss: 0.7096 - accuracy: 0.5625
Epoch 2/5
1/1 [==============================] - 2s 2s/step - loss: 0.5145 - accuracy: 0.8125
Epoch 3/5
1/1 [==============================] - 2s 2s/step - loss: 0.4767 - accuracy: 0.7500
Epoch 4/5
1/1 [==============================] - 2s 2s/step - loss: 0.4246 - accuracy: 0.8125
Epoch 5/5
1/1 [==============================] - 2s 2s/step - loss: 0.4506 - accuracy: 0.7812